Preface
The aim of this document is to give a comprehensive guide on how to set up for game development using Unreal Engine 5 with Vim or Emacs (or any other text editor/IDE that is not officially supported).
This guide makes some assumptions:
- You know how to configure your text editor of choice
- You already know the basics of Unreal Engine 5
- You know how to install software on your Linux distribution of choice
- You are using a text editor/IDE that is capable of using LSP and DAP
- You have basic knowledge of and are comfortable using the Shell and a little bit of Shell-scripting
Personally I use Neovim and Arch Linux, but all information in this guide should also be applicable to every other text editor/IDE with the required feature set and every other Linux distribution (and maybe even Mac or Windows, though I do not use any of those OSes).
Why?
Why am I writing this guide? There are several reasons. Being a Linux gamedev I almost always feel like a second or even third class citizen (except with the Godot Game Engine ♡). Don’t get me wrong people at Epic Games, I am hugely thankful that UE5 is available for Linux at all, but things aren’t as smooth as they could be.
The suggested code editor for Unreal Engine 5 for Linux is Visual Studio Code, which is probably a good choice for 90% of all devs. Additionaly CLion, Kdevelop and CodeLite are supported as well. I don’t really like VS Code, because of reasons. I have tried using CLion and Kdevelop with UE5, but it simply did never work correctly. I just prefer using Vim. Yes, I know that vim-mode-plugins exist for every IDE under the sun (even Emacs has evil-mode). I have tried using most of them and every single one is lacking something that throws me off. So I stick to the original.
Another reason is that I had to piece this information together from several old reddit-threads, forum posts, github gists and good old trial and error. I want to provide help to my fellow eccentric Linux gamedevs that want to stick to their neckbeard ways.
Tools used
Unreal Engine 5
https://www.unrealengine.com/en-US/linux
Installing Unreal Engine 5
The process of installing UE5 fortunately got much easier since Epic now provides binaries. You can compile the engine from source. I have done it, it works, I do not recommend it and I will assume you are using the binaries. Just extract the engine to a sensible location. I have used the following.
~/.local/lib/UnrealEngine-5.1.0
You can use whatever you want, but I like this location. This location will be used later on in the guide, so take care to change it, if you set it to something different.
Epic Asset Manager
https://github.com/AchetaGames/Epic-Asset-Manager
Epic Asset Manager (EAM) can be used to manage all your Unreal Engine projects and assets. When you first start the program, you are asked to login to your epic account and copy an authentication token so that EAM can log in with your credentials. I recommend that you configure EAM the first time you start it. To do so, click on your username in the top right and select “preferences”. You need to change at least the entry “Unreal Engine Directories”.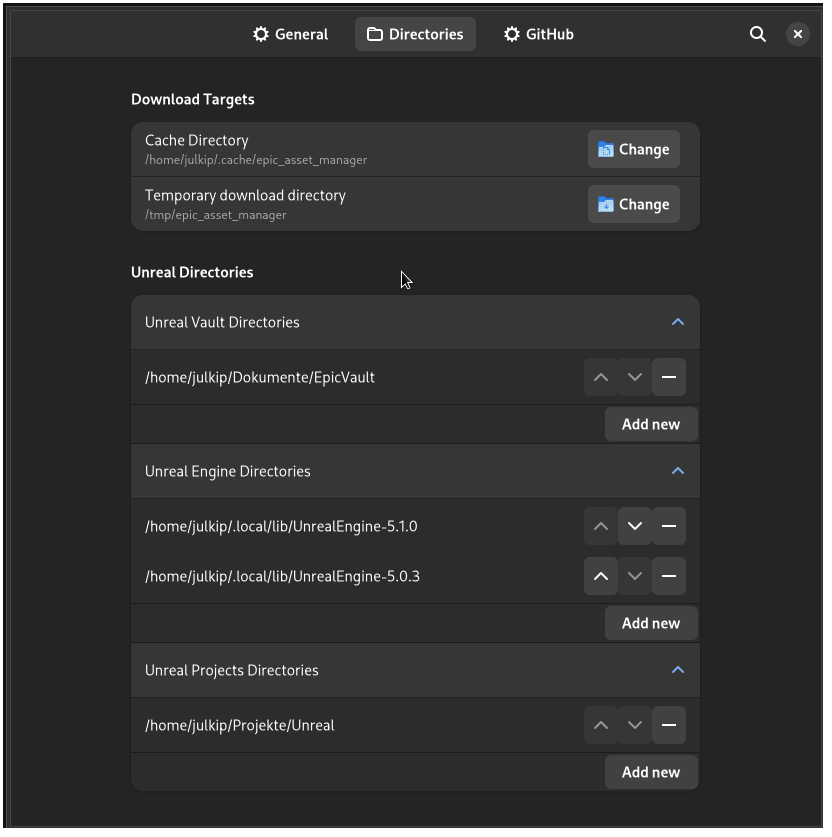 Add whatever path you selected to be the install location of Unreal Engine. Note that it is possible to have more than one version of the engine installed.
ue4cli
https://github.com/adamrehn/ue4cli
ue4cli is a wrapper for the UnrealBuildTool. Theoreticaly it is not necessary to use this, but since UnrealBuildTool is quite cumbersome to use, it is absolutely worth it. The wrapper was initially written for Unreal Engine 4, but it also works with Unreal Engine 5.
At the time of writing, there is a slight problem with using ue4cli with UE5. The wrapper is not able to find the engine binaries on its own and always crashes with an recursion error. To prevent this you have to explicitly set the engine location with the following command:
ue4 setroot ~/.local/lib/UnrealEngine-5.1.0
Please note that, if you have more than one version of Unreal Engine installed, you have to be aware which of your projects use which version and have to set the location accordingly.
clangd
clangd is a language server for C and C++. We will use it later on for code completion and syntax checking.
clang
Although Unreal Engine 5 comes with it’s own version of clang bundeled and uses this version for all it’s needs it is still useful to have a system-wide install of clang to use in conjunction with clangd. You don’t even have to match the version numbers. UE5 comes bundled with version 13.0.1 and I have version 14.0.6 installed on my system.
Managing Unreal Engine projects
If you don’t have any projects for UE5 yet, or you want to create a new project, you can open EAM and select “Engines” from the top bar. Just launch your desired version of UE5, create your project and begin. 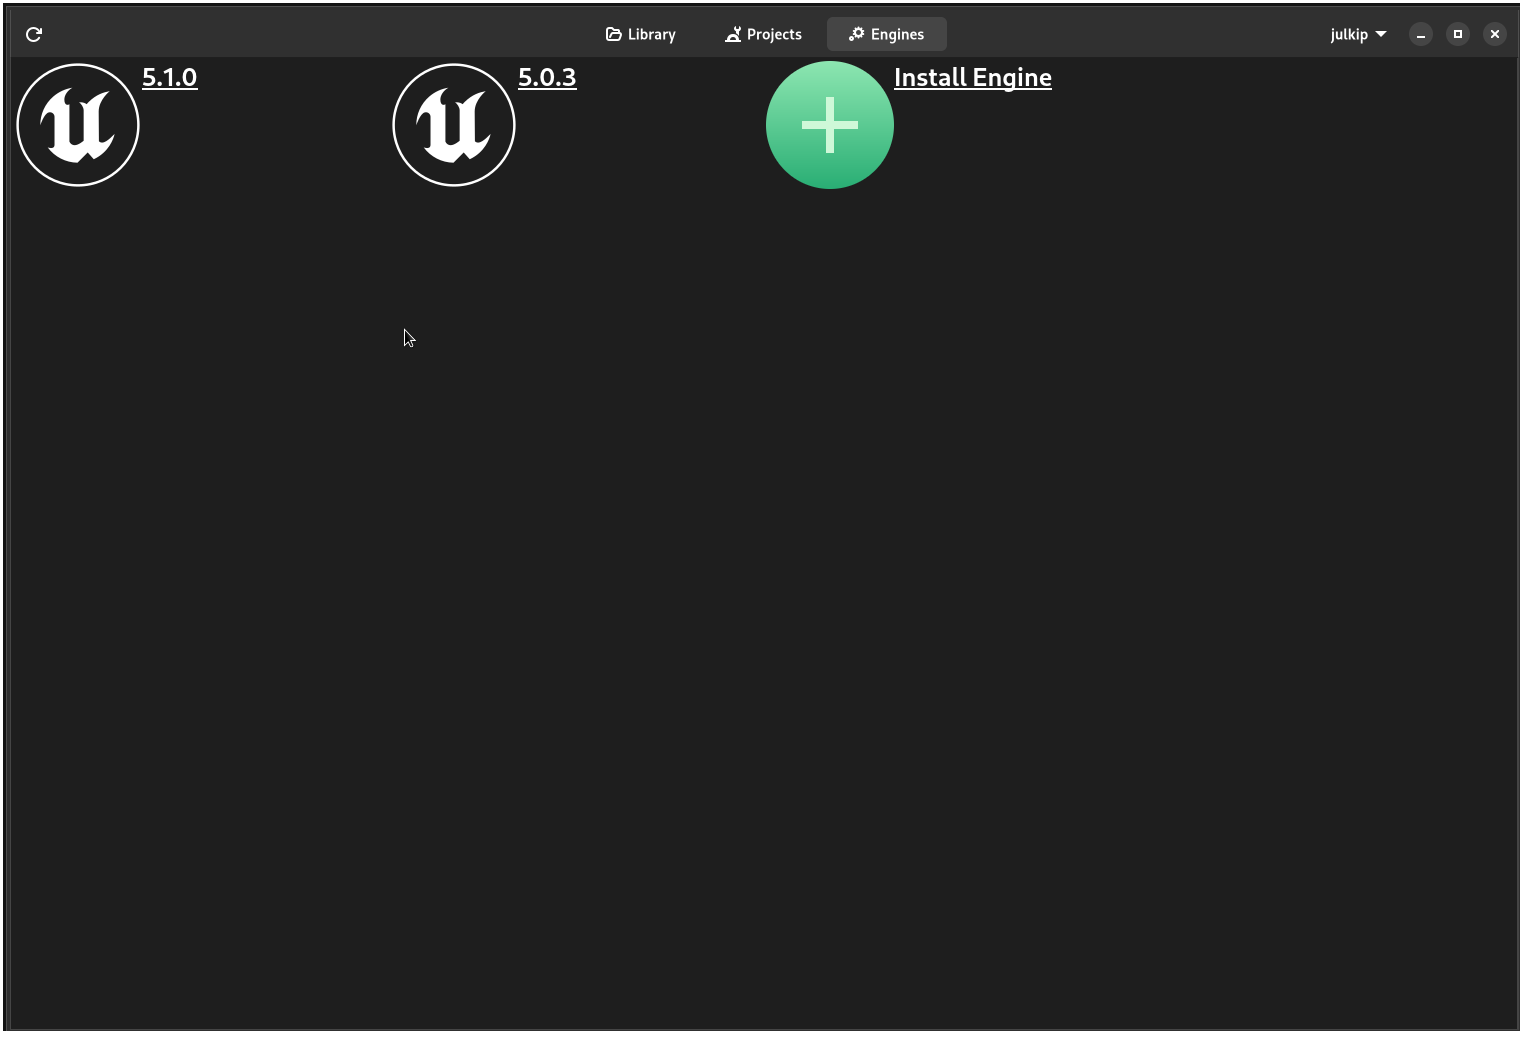
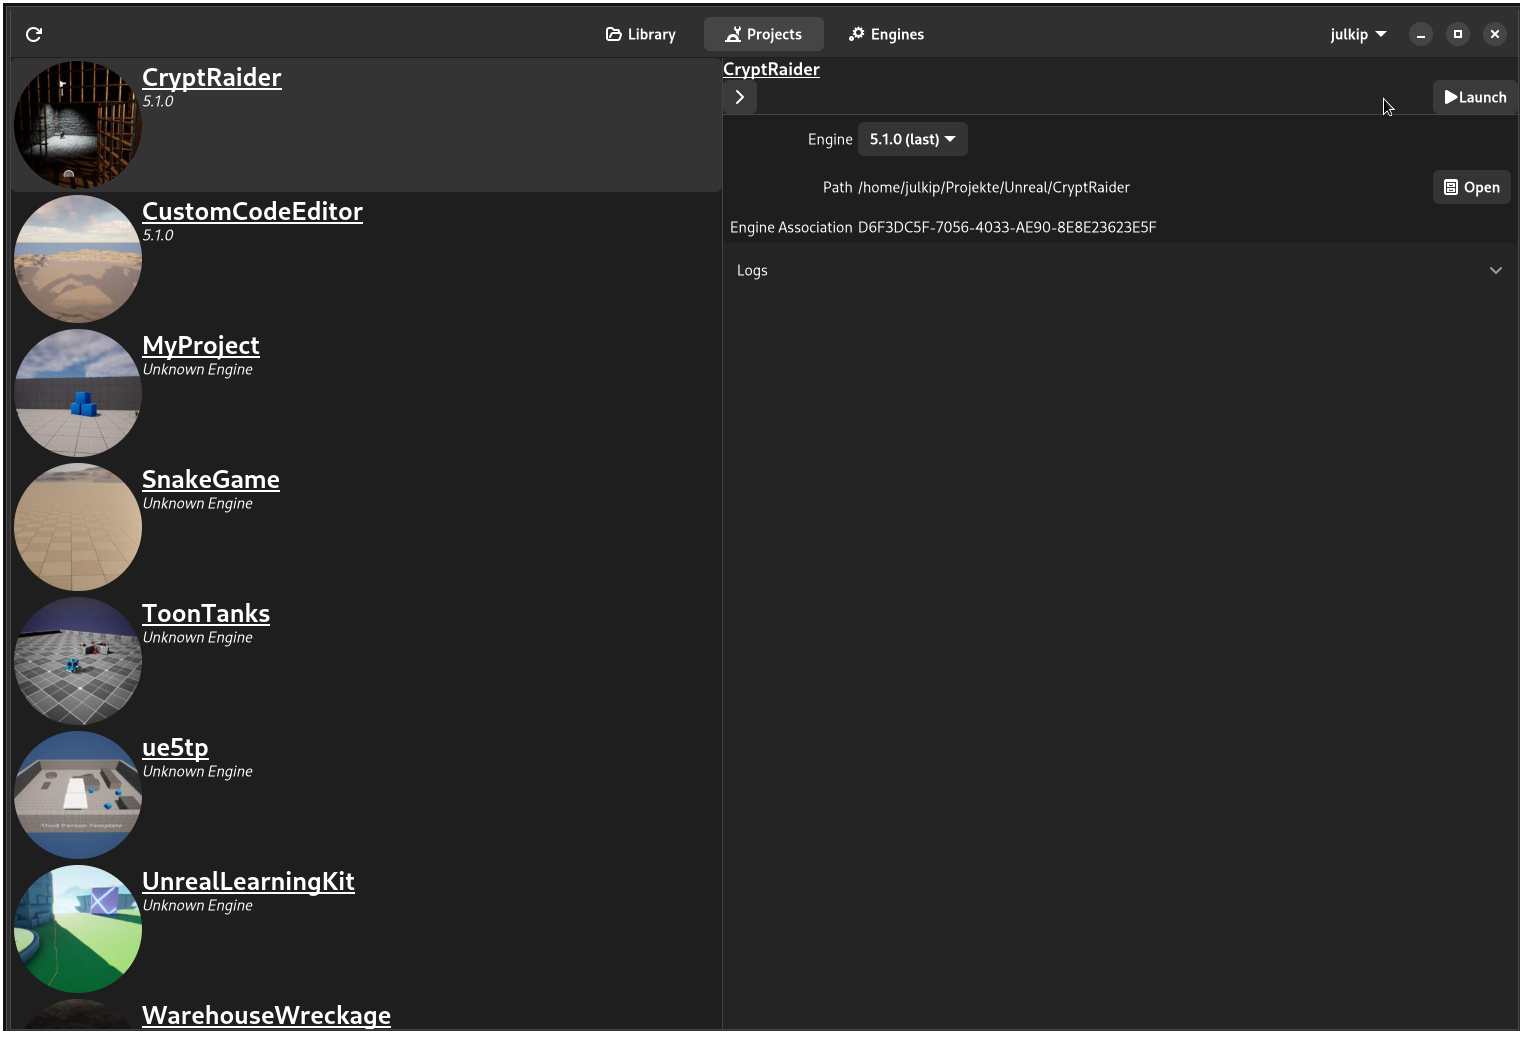
To launch an existing project, simply select “Projects” from the top bar, select your desired project, select the engine version to launch it in and click “Launch”. 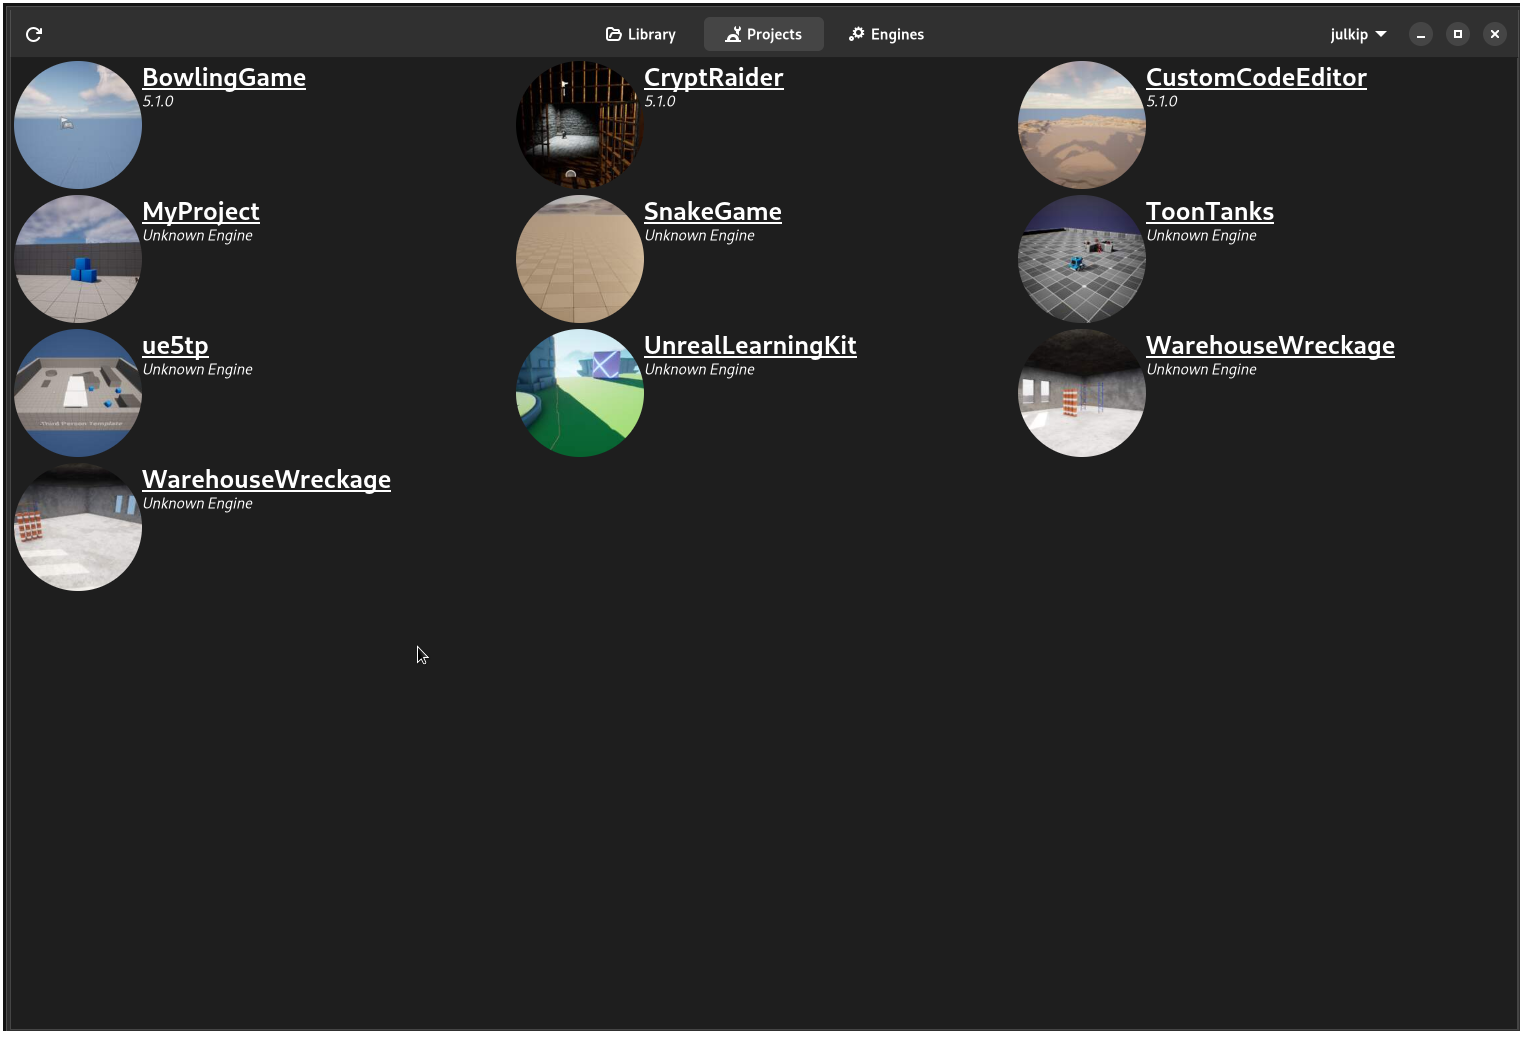
It’s also very much possible to do all this from the command line, but since you need the EAM anyway to manage assets from the Unreal Marketplace I usually use the EAM for these steps.
For the sake of completenes I will give a very short overwiew of how it can be done in the command line using ue4cli. Create a new project by launching the UE5 editor:
ue4 editor
Open an existing project in the UE5 editor:
cd /path/to/project
ue4 run
All of this is also possible without using ue4cli, but getting this to work is left as an exercise to the reader.
Managing assets from the Unreal Engine Marketplace
As the name suggests the Epic Asset Manager can also be used to manage your assets from the Unreal Marketplace. To get the assets in the first place, I would suggest using your browser instead of the heroic games launcher or even running the Epic Games Store through wine. After you open EAM you can select “Library” in the top bar and all your purchased assets will load in. You can then select an asset and download it. If the asset is already downloaded you can, depending on the asset type, add it to a project or create a new project from it using the menu under “Action”. 
Initial setup of Unreal Engine 5
There is not much setup needed for UE5. Simply open the Editor Settings and select “Source Code” from the section “General”. Here you have to set the source code editor to “Null Source Code Access”. Restart the engine to apply the change and you are done.
Compiling projects from the command line
Instead of compiling the project from inside the Unreal Editor, you can also do it from the command line. The benefit of this is that the Editor does not even have to run. You can achieve this by simply calling
ue4 build
from within the project directory. Again this is also doable without ue4cli but is a significantly more complex command.
How to get code completion and syntax checking to work
This is where the fun begins. The project files that are automatically generated by UE5 are geared towards Visual Studio (Code) and also seemingly with Windows in mind. The IDE project files generated by do not work out of the box on Linux (even if you are using VS Code on Linux) and need a bit of massaging. You can generate the project files in two ways. Either you can do so from the Unreal Editor by selecting “Tools” -> “Generate Null Source Access Project”, or you can run the following command from the command line
ue4 gen
Note that even though we selected “Null Source Code Access” as our source code editor, the project files are generated for VS Code. You can find them in /path/to/project/.vscode
Language Servers for C/C++ generally look for a file called compile_commands.json at the projects root. The generated file is located at /path/to/project/.vscode/compileCommands_NameOfProject.json you can copy or symlink this file to /path/to/project/compile_commands.json. However the work is not done yet. To get rid of false error messages we still need to apply some changes to this file. The generated file has a structure like this:
{
  "file": "/path/to/project/Source/NameOfProject/SourceFile.cpp",
  "arguments": [
    "/home/julkip/.local/lib/UnrealEngine-5.1.0/Engine/Extras/ThirdPartyNotUE/SDKs/HostLinux/Linux_x64/v20_clang-13.0.1-centos7/x86_64-unknown-linux-gnu/bin/clang++",
    "@/path/to/project/.vscode/compileCommands_NameOfProject/NameOfProject.242.rsp"
  ],
  "directory": "/home/julkip/.local/lib/UnrealEngine-5.1.0/Engine/Source"
},
You need to change the "arguments"-Array contain to something like this:
{
  "file": "/path/to/project/Source/NameOfProject/SourceFile.cpp",
  "arguments": [
    "clang++ -std=c++20 -ferror-limit=0 -Wall -Wextra -Wpedantic -Wshadow-all -Wno-unused-parameter /path/to/project/Source/NameOfProject/SourceFile.cpp @/path/to/project/.vscode/compileCommands_NameOfProject/NameOfProject.242.rsp"
  ],
  "directory": "/home/julkip/.local/lib/UnrealEngine-5.1.0/Engine/Source"
},
You can adjust the clang-flags to your liking.
You need to do this for every .cpp and .h file and even for the NameOfProject.Build.cs file. You also need to do this every time you regenerate the project files using the Unreal Editor or ue4cli. Because of this it is much easier to write a litte wrapper around ue4cli and use it instead of ue4cli directly.  I implemented it by adding a function to my
 ~/.zshrc but you could also use a shell script to do the same thing.
# Expand ue4cli
ue() {
	ue4cli=$HOME/.local/bin/ue4
	engine_path=$($ue4cli root)

  # cd to ue location
	if [[ "$1" == "engine" ]]; then
		cd $engine_path
  # combine clean and build in one command
	elif [[ "$1" == "rebuild" ]]; then
		$ue4cli clean
		$ue4cli build
		if [[ "$2" == "run" ]]; then
			$ue4cli run
		fi
  # build and optionally run while respecting build flags
	elif [[ "$1" == "build" ]]; then
		if [[ "${@: -1}" == "run" ]]; then
			length="$(($# - 2))" # Get length without last param because of 'run'
			$ue4cli build ${@:2:$length}
			$ue4cli run
		else
			shift 1
			$ue4cli build "$@"
		fi
  # Run project files generation, create a symlink for the compile database and fix-up the compile database
	elif [[ "$1" == "gen" ]]; then
		$ue4cli gen
		project=${PWD##*/}
		cat ".vscode/compileCommands_${project}.json" | python -c 'import json,sys
j = json.load(sys.stdin)
for o in j:
  file = o["file"]
  arg = o["arguments"][1]
  o["arguments"] = ["clang++ -std=c++20 -ferror-limit=0 -Wall -Wextra -Wpedantic -Wshadow-all -Wno-unused-parameter " + file + " " + arg]
print(json.dumps(j, indent=2))' > compile_commands.json
  # Pass through all other commands to ue4
	else
		$ue4cli "$@"
	fi
}

alias ue4='echo Please use ue instead.'
alias ue5='echo Please use ue instead.'
Now you can call
ue gen
to automagically generate the project files for VS Code and convert them to something that Vim can work with. Please note that from now on you always have to use ue instead of ue4
Debugging code
This section is a bit more specificialy written for Neovim. I hope the information here can still be useful for someone wanting to use other editors. For debugging I use nvim-dap with lldb-vscode as the adapter. There is an additional step you have to take to get debugging working. We will be using the file .vscode/launch.json, that was generated by Unreal for VS Code launch configurations. The file has sections that look like this:
{
  "name": "Launch ProjectEditor (DebugGame)",
  "request": "launch",
  "program": "/home/julkip/.local/lib/UnrealEngine-5.1.0/Engine/Binaries/Linux/UnrealEditor-Linux-DebugGame",
  "preLaunchTask": "ProjectEditor Linux DebugGame Build",
  "args": [
    "/path/to/project/Project.uproject"
  ],
  "cwd": "/home/julkip/.local/lib/UnrealEngine-5.1.0",
  "type": "cppdbg",
  "visualizerFile": "/home/julkip/.local/lib/UnrealEngine-5.1.0/Engine/Extras/VisualStudioDebugging/Unreal.natvis",
  "showDisplayString": true
},
We especially care about the line "type" : "cppdbg",. Either you have to configure an adapter within nvim-dap with the name cppdbg or, if you just want to copy the example configuration from nvim-dap, you have to modify the launch.json to "type" : "lldb" for the affected options. You can easily acchieve this by modifying the above script for ue.
Once this is finished, you can use the command :lua require('dap.ext.vscode').load_launchjs(".vscode/launch.json") from within your project root to load the launch configurations. Next you can execute :lua require('dap').toggle_breakpoint() to set a breakpoint on the current line and :lua require('dap').continue() to start debugging (obviously you will probably want to set some keybindings for this). When you start debugging choose ProjectEditor (DebugGame).
A word of warning. My machine has got 16GB of RAM. While it is possible to run and debug UE5 projects with this, it is definitely NOT FUN.
Thanks
I want to give a special shoutout to chillpert (https://gist.github.com/chillpert). His document on autocompletion and debugging UE4 and UE5 with Vim was hugely helpful for getting code completion to work.